Oct 12, 2023
Metal hardness is a critical performance metric that reflects a metal's ability to resist localized plastic deformation. In engineering and materials science, hardness not only affects the performance of materials but also influences processing methods and the quality of the final products.
There are various methods for hardness scale, among which Brinell hardness, Rockwell hardness, and Vickers hardness are the most commonly used. Additionally, in non-metallic materials, Shore hardness is another relevant measurement method.
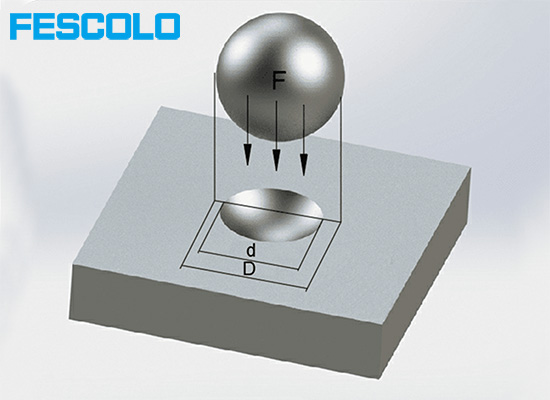
Brinell scale also known as Brinell hardness test involves applying a constant load to a steel ball that presses into the material's surface, measuring the diameter of the resulting indentation to evaluate hardness.
It usually uses a spherical indenter with a diameter of D, which is pressed into the surface of the material with a corresponding test force F. After a specified holding time, the test force is removed, and the average diameter d of the residual indentation is measured to calculate the hardness value.
The calculation formula for Brinell hardness is:

The advantages of Brinell hardness include stability, accuracy, and simplicity of measurement, allowing it to realistically reflect the average hardness of materials. However, its larger indentation size and slower operation make it unsuitable for mass-produced finished parts and thin sections.
Therefore, Brinell hardness is primarily used to measure the hardness of raw materials and semi-finished products, such as cast iron, non-ferrous metals, and softer steels.
Brinell hardness is denoted as HB, with an example being HB 200, which indicates a Brinell hardness of 200.
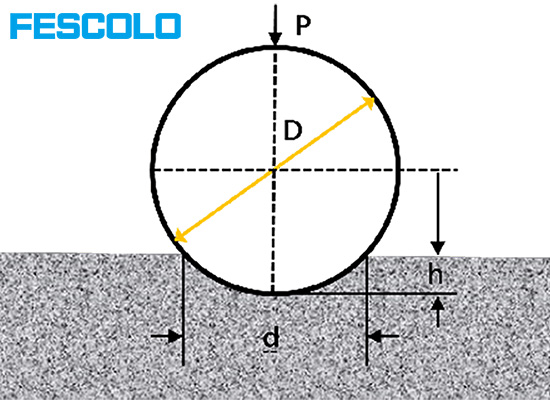
Rockwell scale also known as Rockwell hardness test, it uses a diamond cone or hardened steel ball indenter, which is pressed into the material's surface under a test pressure F. After a specified time, the main test force is removed, and the hardness value is calculated based on the incremental depth of the residual indentation.
The advantages of Rockwell hardness testing include rapid and straightforward testing, small indentations, and a wide hardness measurement range. However, its data accuracy, stability, and repeatability are not as high as those of Brinell hardness.
Rockwell hardness is suitable for finished products and thin materials but is not recommended for materials with large or uneven structures.
It's important to note that Rockwell hardness has three commonly used scales: A, B, and C, with the measured Rockwell hardness expressed as HRA, HRB, and HRC. The characteristics of these scales are as follows:
Scale Name | Indenter | Test Load | Applicable Materials | Measurement Range |
HRA | Diamond Cone | 60 kg | Hard alloys, surface-hardened materials, etc. | 20-88 HRA |
HRB | Hardened Steel Ball | 100 kg | Cast iron, aluminum alloys, copper alloys, etc. | 20-100 HRB |
HRC | Diamond Cone | 150 kg | Quenched steel, tool steel, etc. | 20-70 HRC |
When the hardness of the tested material falls outside the scale range, sensitivity decreases, leading to inaccurate results. In such cases, another scale should be used.
There is no direct conversion formula between Rockwell hardness scales, but some approximate relationships can be derived from experimental data. For example, according to the American standard ASTM E140, the following conversions can be established: 27 HRA ≈ 30 HRB; 60 HRA ≈ 100 HRB ≈ 20 HRC; 85.6 HRA ≈ 68 HRC.
These conversion relationships are for reference only, and actual results may vary due to material differences.
Vickers hardness test involves using a diamond indenter with a rhombic cutting angle to apply a specific pressure to the material's surface and measuring the diagonal length of the indentation to calculate the hardness value.
Vickers hardness is highly precise and repeatable, but it requires high-accuracy measurements, making the testing process relatively slow. Additionally, surface treatment of the test sample is necessary prior to measurement.
Thus, Vickers hardness is mainly used in material research and scientific experiments, particularly suitable for applications requiring high material performance, such as small precision components and surface hardness of coatings.
Vickers hardness is denoted as HV, with the expression format being code + hardness value, such as HV 200, indicating a Vickers hardness value of 200.
Shore hardness is generally measured using a Shore hardness tester, which provides quick and convenient measurements, but it is only suitable for soft materials and not for hard materials like metals. Common types of Shore hardness include Shore A and Shore D:
◆ Shore A is suitable for softer elastic materials such as rubber, soft plastics, and foam plastics, denoted as HA (or Shore A), with a range of 0-100 HA.
◆ Shore D is used for harder elastic materials, such as hard plastics and rigid polyurethane, denoted as HD (or Shore D), with a range of 0-100 HD.
There is no clear correspondence between Shore A and Shore D hardness. However, in practice, hardness values above 90A are often converted to D. Additionally, approximate conversion relationships can be derived from experience:
◆ D = A-50
◆ A = 0.173D+86.58
These are four commonly used methods for expressing hardness. Brinell, Rockwell, and Vickers hardness are frequently used to measure metal hardness, while Shore hardness is widely used for measuring the hardness of elastic materials.
Measuring material hardness and establishing a hardness classification system is significant.
◆ It helps engineers easily select appropriate materials to meet specific application requirements.
◆ Material hardness is closely related to its mechanical properties, and hardness testing can indirectly assess a material's strength, toughness, and durability.
◆ In production, hardness testing guides the choice of processing methods, ensuring material consistency and improving production efficiency and product quality.
FESCOLO is a professional manufacturer specializing in various pneumatic components. We offer a range of cylinders and cylinder accessories made from materials including copper, brass, stainless steel, and aluminum alloy. If you have any needs, please click here to visit our Product page for more information.
You can also click here to visit our Blog page, where we provide a series of more detailed and comprehensive articles, images, and videos to help you better understand pneumatic components and related knowledge.
 Pneumatic Clamping Module Design in Packaging Machinery
 Pneumatic Fittings Replacement Cycle: How Often Should You Change Pneumatic Fittings
 Pneumatic Pusher Module Design in Pneumatic Packaging Machines
 Vacuum Filter and Response Time: Does Filtration Slow Down Vacuum Systems
 Metal Seated Pneumatic Ball Valve: When Is Metal Sealing Required?
©1998-2026 Fescolo. A brand of Fokca Automation Co., Ltd. All Rights Reserved Sitemap